
Note: This example does not work with version 1.1.1 because of a bug, but it does work correctly in version 1.2 or later
The following example will take you step by step through the process that is required to encrypt and decrypt a message using Enigma Simulator.
Hint: Use the "Example Settings" script found in Enigma Simulator's script menu to automatically set the correct rotors, reflector, Ringstellung, and Steckerbrett to use with this example. But only if you want to, because that would take away all the fun! Right?
- Setup
- Choose Rotors & Reflector
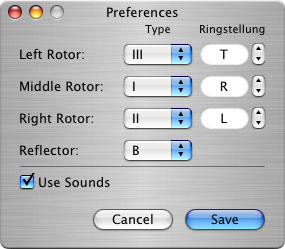 First, open up the Preferences window under the "Enigma Simulator" menu. In this window you can choose which rotors and reflector you want to use. In this example, you should set the left rotor to 'III,' the middle rotor to 'I,' the right rotor to 'II,' and the reflector to 'B.'
 - Set Ringstellung (ring settings)
Also in the Preferences window, set the ringstellung to 'T' (left), 'R' (middle), and 'L' (right). If your mouse has scrolling capabilities, you can also scroll over the ring settings in order to change them. Click 'Save' to close the Preferences window and to save your settings. The new settings will not take effect until you have clicked the 'Save' button. 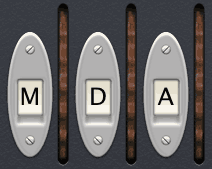 Set Rotor Positions
In the main window, set the rotor positions to 'M' (left), 'D' (middle), and 'A' (right) by either clicking the rotor wheels or using the scroll wheel on your mouse when the cursor is near the rotor position indicator or wheel.- Steckerbrett (plug board) Setup
Open the Steckerbrett under the 'Window' menu. Click and drag from the socket underneath the letter 'M' to the socket underneath the letter 'T' and let go of the mouse after the plug has snapped into place. Repeat this procedure for the following letter combinations:
'O' & 'E' - 'L' & 'R' - 'I' & 'Y'.
To remove a plug, drag it and let go when it is not snapped into a socket.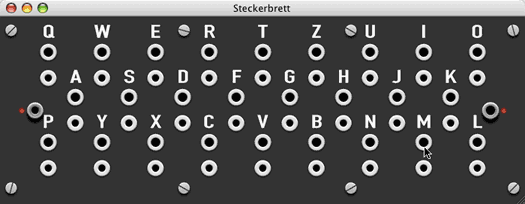
- Open Schreibmax (printer)
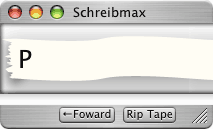
Open the Schreibmax window under the 'Window' menu. This window will display the encrypted letters that light up when you type.
- Choose Rotors & Reflector
 Input
Input
We will be inputting the message "HELLO WORLD." To begin, type and hold the letter 'H' (no shift key necessary) or click and hold the 'H' key that is in the main window. You should notice that the letter 'P' lights up and the rotors change positions to 'MDB.' The Schreibmax will also print the letter 'P' when you stop holding the key. Continue typing in the rest of the message in this manner.
When you reach the space in the message, you have several options. First, you can throw it out, though when you decrypt the message it will no longer have a space. Additionally, you can either hit the spacebar on your keyboard or you can click the 'Foward' button in the Schreibmax window.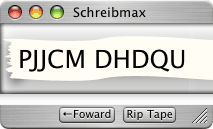 These methods will cause the space to stay intact although they only work when the Schreibmax window is open. For the purpose of this demonstration, we will be keeping the space.
After you have finished entering in the message, the rotors should be in the position 'MEK' and the Schreibmax should show the text "PJJCM DHDQU." This is the encrypted message.- Decryption Setup
In order to decrypt the message, the Enigma Simulator must be in the exact setup that was current before you began inputting your message. You will not be able to decrypt the message unless the settings are exactly the same as in the 'Setup' section of this guide. Unless you altered some of the settings after encryption, you should only have to change the rotor positions back to their original setting (MDA). You can click "Rip Tape" to clear the Schreibmax if you would like (but you will be unable to see the encrypted text any more). 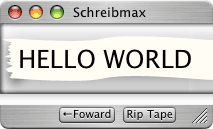 Decryption
Follow the same steps outlined in the 'Input' section of this guide, except this time enter in the text "PJJCM DHDQU." The Schreibmax should now show the original message, "HELLO WORLD." That's it!